RaceCake baby steps

HELL’S HORSES,

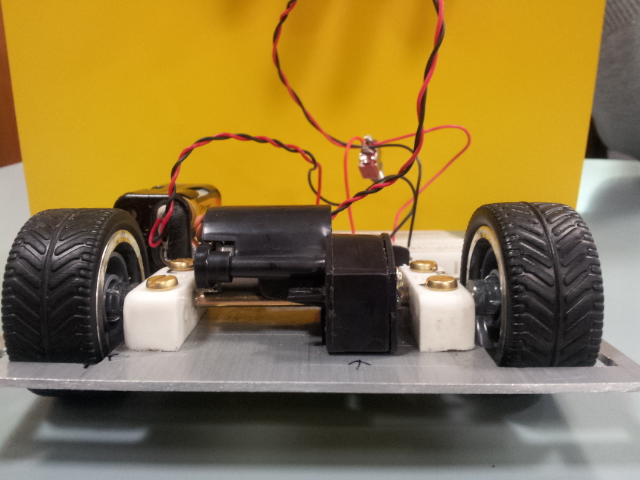
Things seem to be going good so far in with team C.A.K.E. In class last Friday morning we managed to get a racer doing some test runs on the table and I’m glad to announce they were successful………..sort of. While we did get the machine running, a few problems did crop up, but this is a good thing a it can only lead to improvements! First of all, my front axle wasn’t exactly level so this led to C.A.K.E. taking the long way around the table. Since it was unbalanced only one wheel was driving the whole robot so it would head right when ever we ran it. The next issue was the questionable durability of the breadboards and their ability to survive a knock without having half of the wires falling out of the holes. Stall current with the motors also posed a serious threat to the project as the voltage would drop considerably causing the PIC and driver chip to reset, boo! On top of all these problems, two breadboards and a rake of wires looks a bit sh*t if you ask me.

But after a quick meeting today, it looks as though all of these issues have been dealt with.

To overcome the wires coming out of the breadboard, the decision to transfer our circuit onto a more permanent board was taken. Chris and I began this task in class on Friday and Gian did a sweet job of finishing it off for us at home during the weekend. This has led to a smaller and more secure board which should help with mounting issue. The problem with the stall current was figured out by Gian(SOUND BUD!), but I think we are going to keep that piece a secret for now.

To fix the issue of the axle, I scraped the two brackets I was using and managed to use the pre drilled holes in two new ones as these would be lot more in line than the ones I previously drilled. This worked a treat and now the front wheels spin a lot more freely and she runs straight as well.

With all these problems fixed, code written and cleaned up by Chris I thought that a lick of paint would tidy things up a lot. Inspiration came from the likes of this,

The first job was to remove all the part from the chassis, give it a quick sanding and a clean with some white spirits just to get rid of any dirt or grease, I managed to fill the big hole in the middle with some body fillers as well just to neaten it up.

A quick coat of primer to help the paint set and a blast of spray paint later and voila! Gave the brackets a spray too, just to get rid of the plastic look.

According to my maths the white stripe down the middle will increase the speed overall “whitestripe = speedx2”, so it made perfect sense to do this. Anyway, looking forward to getting everything mounted up and ready to go for the race. Best of luck everyone!


Cake 1.1 “RaceCake”

Well!!!!!!

Some serious progress made since last time. Got a chassis made up for the race and as promised I have a few pics. I used aluminium again as this is fairly light but strong and easy to work with. The new wheels Gian acquired took a while to get fixed to the new gearbox since the shaft was considerably smaller then the hole in the middle of the wheels but after a few hours of pulling my hair out I came up with a solution. Using a small barrel connector, I built up the size of the shaft coming from the gearbox from 2.5mm to 4mm so it matched the hole in the centre of the wheel. Then using a epoxy putty I filled in and around the shaft inside the wheel to prevent the shaft from coming loose once it was placed inside the wheel.

I used the same material as the prototype for the chassis. I cut out a piece and began marking it for the wheels and gearbox. Makes for a nice tight piece with notches cut out for the wheels to pass through.

I managed to recycle the axle from my first attempt at building this thing and it fitted in just right fir the front of the robot. Using a few spacers and more copper barrels to ensure that there is no unnecessary movement in the front axle. This part needs a little more tweaking to get it just right! Almost finished with this design, another day of tinkering about should have it perfect, maybe a paint job to compliment all the other great work being put into this. The lads and I are here now coming up with ways to mount the circuit to this bad boy before tomorrow’s class. If all goes well today it should be functional in the morning!!!!!

Hers a few more pics with all the bits assembled(no circuit yet!)

gearbox and front axle
side view blinging rims


Top view, managed to get a sponsor ship deal!!

Update

Heres a few litle bits that we got working in the class last friday

Led flashing siuluating motors

Motor pulses


Motor working with motor driver forward/reverse


I will have the final race chassis made by tomorrow evening and I will through up some pics of that!!

RoboSumo week 2

Hello again,

Just a small update on how things are progressing so far. Friday morning’s class was very productive indeed. After about an hour of talking and messing with ideas we got down to work. Our first task was to get the L293D motor driver IC up and running. This thing can be confusing at first but you will get the hang of it pretty quickly, this is a great website for explaining its operation and how to connect it up if anyone is not too sure about it,  http://www.robotplatform.com/howto/L293/motor_driver_1.html. We have some videos of this thing working, Gian and Chris have them fancy phones so I left the filming to them. The videos should be up soon. Gian and Chris managed to write up a rough sample code to demonstrate the operation of the chip. We simulated the operation of the micro switch with a toggle switch and demonstrated how the motor would reverse its direction as the switch was operated(something similar to the preliminary challenge of the race to the wall). Again the lads have videos of this and I will get them off them during the week and post them up.

New parts also arrived. This means a slight change in design to our prototype robot seen in earlier posts will be necessary. I came up with the idea that since it was a race lets make this thing look like a racer. So hopefully by the end of this week I will have some sort of chassis finished that will incorporate this vision. I have drawings of ideas for this “racebot” and I will post them up as soon as possible.

RoboSumo week 1

So as promised here is a few pics of a quick prototype I came up with during last weekend. The idea of this was to just get a feel of the size limits that are mentioned in the rules of the tournament.

The base was made of a piece of aluminium that I had at home, it makes for a great strong base to work on and is very easy to cut and size. The wheels and gearbox shown belong to my partner Gian. He removed these from one of his own RC cars from home. Luckily enough they fitted within the 15cm limit without having to alter the axles. These are held in place with a few nuts and bolts and two brackets from and old kitchen shelf are being used to mount the axle.

I used the supplied battery pack and a switch to have a look at she would run, but like I said this is only a prototype. Definitely a need for four wheels in the race!!!ImageImageImageImage

So I hope to have something new up today or tomorrow. Got loads done in class on Friday morning, lots to say about that!


RoboSumo

Hello everyone,

This blog will be documenting the progress our robosumo competitor C.A.K.E(Classroom Assault Killer Experiment). I will be updating this space at least once a week with my ideas for the competition such as designs for robots including drawings and pictures. Along with that, there will be updates of my own and our team’s progress in the building and design phase, so keep an eye out!!

Some pictures of a prototype should be up by tomorrow


G’luck